The body shop had Matilda for about nine weeks in total, even though at first glance it appeared the majority of the work had been done after about one week. Within one week they had the body on the frame, but then they still had to install a steering column, polish and install brightwork, align the front fenders and hood, and various other details. One good example of a persistent minor detail that eats up time was the rag joint. The rag joint joins the steering column to the steering box, and the first one they ordered turned out to have the wrong spline count on one side, so they had to wait a week for the correct one to show up.
Another thing that took some time was the back seat area. When I started this project, my original plan was to have a complete, essentially stock, interior. As the project progressed, at some point I thought maybe I'd rather replace the back seat with a panel to block off the holes in the rear bulkhead, and install a four-point roll bar. I went back and forth on the idea several times, but finally decided that, if nothing else, the roll bar would provide a good place to attach shoulder harnesses. And I thought shoulder harnesses would be a good idea if I was ever going to take the car to a track day or an autocross or anything like that, both of which I want to do. So I decided to go ahead and scrap the back seat in favor of the roll bar.
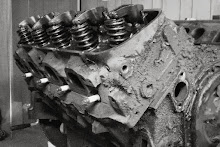
Here's a picture of the car after the shop had had it for about a month, I'd guess:

You can see the side of the roll bar through the side window, but you can see the chrome trim around the back window and other brightwork has not yet been installed.
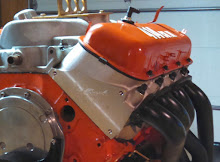
About a month later they'd gotten the correct rag joint, installed most of the trim, installed all the glass, and called to say it was ready to pick it up. I went to get it on a Monday morning. When I got there, they rolled it out the back of their shop, and I took a few pictures while waiting for the rollback to arrive:


So shiny! This is before they've even cut and buffed the paint.
I should probably clarify the plan, actually, for anyone who doesn't already know: I am going to install the gas tank, radiator, brakes, and so on, get the car running and driveable, then take it back to the body shop again for them to get the stripe painted on it and finish up some last details on their end. The painter they work with works by himself and requires cars to be driveable when he gets them, because otherwise he can't move them around by himself. So anyway, I still have a ton of work to do.
As another example of a small detail that delays the project, I ran into a complication on the very first item that I decided to tackle after getting the car home. Once I had the car home in the garage, I thought I'd start by installing the gas tank. Before I did that, I figured I'd install the fuel level sender and pickup in the gas tank, which is when I ran into trouble.
I had gotten a set of Stewart-Warner gauges for the dash, including a fuel level gauge, and the set of gauges included a fuel level sender with the correct resistance to work with the gauge. Their sender has a long arm on its float, which is intended to be trimmed so that it will be the correct length to put the float at "top" when the tank is full, and "bottom" when the tank is empty.
I was going to install their sender in my tank, but when I got it out of the box, I found that their sender is really just a fuel level sender, and does not include a pickup tube. Once I thought about it, this makes sense, because they don't know the shape of your gas tank (the gauges are intended to work with any vehicle), so they don't know how long to make the pickup tube so that it will be positioned at the bottom of the tank. So I guess their intent is that you will make a new hole in the top of your tank, weld in a mounting flange, and install their fuel level sender there. Then you would also install the stock sender, in its stock location, just to use its pickup tube.
Well, I didn't want to do all that, I just wanted to have one sender/pickup in the stock location and be done with it. So first I checked the resistance of the stock sender and compared it to the resistance of the Stewart-Warner sender. Of course they weren't even close. The stock sender was something like 0-90ohms, and the SW unit is something like 30-240ohms.
So in the end, I decided to hack up both senders and Frankenstein something together for my purposes. I removed the electrical sending unit from the stock sender, which left a convenient flange where it had been mounted. I removed the electrical sending unit from the SW sender, and started working on a bracket that would allow me to bolt it to the flange on the stock pickup.
I had meant to take pictures of the process as I went, but I kept forgetting to, so when I was done I took some pictures to try to show what had happened, after the fact.
I started by making a bracket out of cardboard:

Then I flattened it out so I'd have a two-dimensional template for what I needed to cut out of metal:

Maybe the only good thing about junk mail is that it provides a virtually endless supply of this kind of heavy paper/light cardboard that can be used for things like this. I used a sheet of steel that I already had in the garage, I think it was 22ga.
At this point is where there are a bunch of missing, undocumented steps, but the following four pictures show the end result:


So this is the stock pickup tube with the SW sending unit bolted to the side of it, using the SW float and arm. I bent the SW float arm to replicate the travel of the stock float arm. I used four small nuts, screws and washers to bolt everything together. The bracket didn't end up matching the template exactly, as I discovered some areas that needed to be clearanced as I put it all together. I used Permatex red threadlocker on the screws, to try to make sure they don't come apart. Permatex says the red threadlocker will maintain its properties in gasoline.
So that's about it for that, the sender is now installed in the gas tank, but I still haven't got the gas tank installed under the car.
Anyway, nobody likes looking at photos of brackets, so here's one more beauty shot for the folks who read all the way to the end: