Thursday, October 16, 2014

Prime Mover

When I was in college, my senior design project was to (working in a small team) design and build and mount all the electrical and electronic components for the Formula SAE team's car.  There were other teams assigned to other subsystems of the car.  Once a week, we all got together to give a presentation on our progress.  About halfway through the semester, I started to realize that we were the only team that had to come through on all our deliverables in order for the car to run.  The engine team, for example, would say, "We designed this great intake manifold, but we're not going to have time to get it made, so this year's car will run with the stock intake manifold.  Maybe the manifold we designed will be for next year's car."  A month or so before the end of the semester, one of the professors asked me how we were coming along with the electrical systems.  I told him, "Gee, I don't know, electrical systems might have to end up being something for next year's car."  He was not amused.

Another thing that differentiated our team from the others was the format of our presentations.  The other teams all used fancy powerpoint formats with official university logos, and their slides were crowded with colorful graphics of car components and eye-catching animations.  We prided ourselves on our spartan presentation.  We used a generic powerpoint format and simple bullet point text, except where illustration was of practical value.  A member of one of the other teams commented on this once, and I (half-) joked, "You don't need all that extra stuff when you've got actual content."  He laughed and (half-) joked, "Oh, I wouldn't know anything about that."

(He is, to be fair, probably a vice president somewhere now, I'd guess.)

Anyway, this is all an unnecessarily elaborate introduction to recognize that these entries sometimes lean heavily on unnecessarily elaborate prose to fill in the gaps between actual content.

But this entry will show that you don't need all that extra stuff when you've got actual content.

I've made some mention of engine building in previous entries, including some pictures of the bottom end going together, and some discussion of camshaft endplay adjustment.  After the bottom end was together, I was able to make a rough measurement of piston protrusion.  There are better fixtures available for this, but I just used a magnetic base and a dial indicator.

I started by putting the magnetic base on the deck of the block, positioning the dial indicator right next to the cylinder bore.  Then I'd zero the dial indicator there:
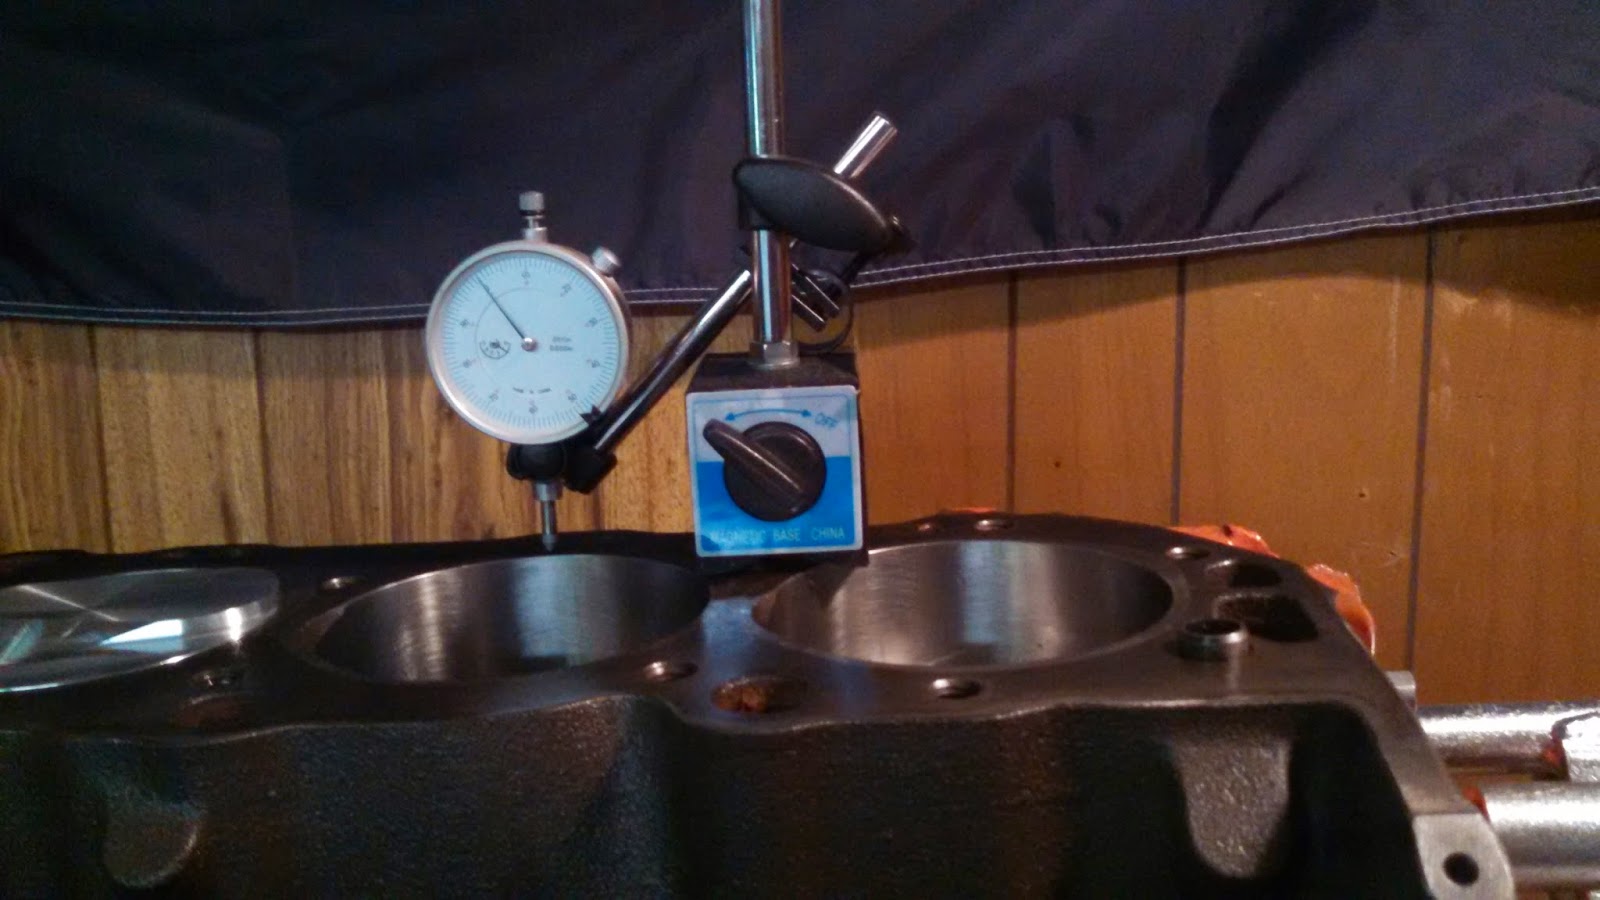
Then I'd move the dial indicator over the cylinder and rotate the engine until that piston came to top dead center.

When I first started this, I would then move the dial indicator back to the deck and check the zero on it, and I also tried a few different spots around the piston.  When I felt like I was getting reliable measurements, I moved on and did the rest of the cylinders.

The photo above shows a reading of 0.088", but that actually represents 1.000" minus 0.012", or 0.12" below the deck height.  Everything I measured came in around 0.012"-0.015".  That worked out great, because I read an article which recommended around 0.050" squish area, and the Edelbrock head gaskets advertise a compressed thickness of 0.038", so that puts me right in the neighborhood.

The photo below shows how I positioned the magnetic base and dial indicator in order to measure camshaft endplay.  I used some small machine screws to extend the dial indicator's tip to reach the back side of the camshaft timing gear.


Having determined what thickness head gasket I needed, I went ahead and started assembling the top end.  The photo below shows a head gasket in place, with the ARP head studs also threaded into the block.  Actually, though, I sprayed the head gaskets with Permatex Copper Spray-A-Gasket Hi-Temp Sealant before assembly.


 One head on:

The other head gasket, sprayed with the Hi-Temp Sealant:


Two heads on:


Getting ready to degree the cam, with the degree wheel bolted to the front of the crank:


Rockers and pushrods installed, lash adjusted:


Dial indicator and mag base again, getting ready to degree the cam.


To degree the cam, you have to find top dead center on cylinder 1, zero the pointer on your degree wheel, then find maximum lift for the cylinder 1 intake valve, and compare that to the camshaft manufacturer's spec.  To find top dead center, they recommend that you get a piston stop of some kind, thread it into the spark plug hole, turn the engine until the piston hits the stop, write down the number you read on your degree wheel, then turn the engine in the opposite direction until the piston hits the stop again, write down that number, and top dead center will be halfway between those two numbers.  Well, I didn't like the piston stop much, I could never tell when I was it or not, and I actually ended up bending it.  I decided to take a three-inch-long 3/8" drive ratchet extension, stick that in the spark plug hole and keep my finger on the end of it while I turned the engine.  That way, I could actually feel when the piston touched the end of the extension.

After running through all that, I found that my intake valve was hitting max lift at 105 degrees after top dead center.  If you're not on the spec, there are two alternate keyways in the crankshaft timing gear, one of which advances the cam four degrees, and one of which retards the cam four degrees.  The spec for my cam is 106 degrees, though, so the alternate keyways weren't going to get me any closer.

The photo below shows the locking tabs for the cam bolts folded over to prevent the bolts from backing out.


Because of the aftermarket aluminum timing cover being thicker than the stock stamped steel cover, that meant that the stock stamped steel timing pointer wouldn't fit anymore.  So, I got an aftermarket adjustable timing pointer:


This required locating top dead center one more time so that the pointer could be adjusted to zero.  After I had it set up, I also made a small scratch where the movable pointer bolts to the base of the pointer, continuing the scratch from one piece onto the other.  That way if it ever shifts out of adjustment, I will be able to line up the scratch marks to put it back where it was.

At that point, I decided it was about time to bolt the intake manifold on.  That was pretty straightfoward, except that there were a few bolts that I couldn't fit my torque wrench on to, because of clearance problems.  Fortunately, the bolts took a 3/8" wrench, so it was very easy to get a 3/8" combination wrench, put the box end on the bolt head, and put the open end on a torque wrench to torque the bolts:


The key is to always keep the combination wrench perpendicular to the torque wrench so that it won't throw off the torque value.  If the bolts aren't 3/8", you can put an appropriately sized hex drive ("allen key") socket on the torque wrench and fit your combination wrench on to that hex drive.

Anyway, then I bolted the rocker covers down, put a PCV valve and a breather filter on it, and, wow, this thing looks like an engine again:


One of the last things I did was to finally put the oil pan on it:


In an earlier post I said I was going to re-use the stock oil pan, but later I got to be worried that I hadn't cleaned all the blasting media out of the pan after I blasted it clean.  There were a lot of nooks and crannies that I couldn't reach to clean them out.  So, I looked around online a little bit and I found a cool pan from TransDapt, with an increased capacity sump and wings to keep it low profile, and internal baffles and trap doors to keep the oil pump pickup submerged even under hard cornering.  I'm going to be 100% honest and say the main reason I got it was because it looks like something a racecar would use (which is because it's designed for racing).  The drawback is that the increased capacity is going to mean paying for an extra quart or two of oil every time I do an oil change, but I think I will do an oil analysis to see if I can extend my oil change interval as a result of the increased capacity, too.  The increased interval will offset the increased capacity somewhat, cost-wise, I think/hope.  Also, I do plan/hope to eventually run this car around a race track or autocross course or two, so it can't hurt to have a race-ready oil pan, right?

Anyway, this past weekend was the first one in a long time where it didn't seem like something immediately went wrong as soon as I started working in the garage.  When it was Saturday afternoon and I'd already finished everything I'd planned on doing, I realized that there was still time to do a lot more.

I'm not putting a water pump on the car yet, because I don't know yet if I'll have to use a short pump or not.  Early big blocks had a short water pump, later engines had a long one.  I'd like to use the long one, because it's what was on the engine when it was in the Monte Carlo, and I just like that arrangement better.  But, since the Impala would have had the short pump, I need to find out first if there's clearance for the long pump.  I won't know that until there's a radiator in front of the engine.  Which water pump I use will determine which waterneck I use, so I'm not putting the thermostat on yet, either.  The distributor will go in right before first fire, after I use an old distributor shaft to prime the oil pump.  So, that all adds up to mean that the engine is about as together as it's going to get at this point.

So, I decided it was time to pick it off the engine stand...


...and set it on the frame:


Eagle-eyed readers might notice that in the first of those two pictures, the engine has a flywheel on it, and in the second picture it has a bellhousing block plate on it.  I bolted the flywheel up while it was still on the engine stand, then realized that I had forgotten to put the block plate on first.

Then the flywheel went back on:


Then the clutch:


Then the bellhousing, and the transmission:


This is getting exciting!


Those eagle-eyed readers might notice there that there are a couple of hoses sticking out of the clutchfork hole in the side of the bellhousing.  I decided to use a hydraulic clutch, and those are the bleed fitting and the pressure connection for the hydraulic throwout bearing.

The throwout bearing requires some adjustment to get the proper clearance between the bearing and the clutch diaphragm fingers.  That requires taking the transmission off to adjust the bearing, then putting it on to check clearance.  When I first mounted the trans, I just wrestled it up there.  Confronted with removal and replacement, I decided to make some guide pins to make the job a little easier.  I bought four of the longest 7/16" bolts I could find and cut the heads off of them, then threaded those into the bellhousing in place of the transmission bolts:


This is a common trick when working with big stuff on locomotive engines.  Maybe overkill for this job, but ... hey, why don't you wrestle that transmission around if you think it's so easy?

That gave me something to get the trans started on to line it up and guide it into place.  In the photo below, the tail of the trans is resting on the crossmember of the frame, and the front is sitting on the guide pins.


After the trans was in place, I removed the guide pins one at a time and replaced each one with a bolt as I went.

I ran into one problem while adjusting the throwout bearing.  It has a threaded collar built into it, and that collar rides up against the front of the transmission.  Unscrewing that collar effectively makes the throwout bearing longer, and pushes its bearing surface towards the clutch diaphragm fingers to reduce clearance.  You can only adjust it in full turns of the collar, because the bleed fitting hose has to be at the top of the bearing.  Well, I needed three-and-a-half turns of adjustment, of course.  I thought, "Well, I'll just turn the bearing housing all the way down until it tightens up on the collar, then turn it a half turn so that the collar turns a half turn with it, then back it off to where I want to be."  Well, I didn't really think that through, because after I'd done that the collar had gotten screwed into the bearing body so tight that I couldn't unscrew it.  That was really frustrating and I tried a bunch of hopelessly stupid ideas for unscrewing it before I finally noticed one of my old axles in the corner.  The axles are tapered, so I just pushed the bearing down onto the axle until the collar was jammed on to the taper.  That allowed me to loosen up the collar, then I pulled the whole assembly off of the axle and put it back on the transmission.  When I got it all back together, I was able to put the clearance right in the middle of the spec.

It's always something.

Anyway, it's really exciting to see the engine and transmission sitting on the frame.  I have one more thing to button up on the bellhousing, and that will show up in a future post.  After that, I think it's all suspension work from here until the time when I'm ready to roll the thing back to the body shop.


Friday, September 26, 2014

field work

If you're ever looking to buy an old car, there may come a time when you're talking to a seller and it sounds like they say something along the lines of, "Yeah, the thing was just sitting in a field for a couple years before I found it."  And it will really sound like that's what they said.  But I promise you, that's not what they said.  What they actually said was, "Do not buy this car."

I've recently been considering the possibility of adding a pickup truck to my fleet.  I remember when I was in college, me and my buddy Allen reasoned out that you need at least three vehicles in your fleet:  one to drive, one as a long-term project, and one as a back-up in case your driver unexpectedly turns into a short-term project, or even a second long-term project.

On top of that, I've thought for a long time that there would be some obvious advantages to having a pickup truck.  Right now I have to borrow a friend's truck to do things like taking an engine block to the machine shop, or taking a differential to be rebuilt, etc.  So, because I like old things, and because I like Chevys, I've been looking at old Chevy pickups.  I'm especially taken with the 1961 model.  It's just so ... ugly.  It's hard to resist.

The hardest thing is trying to balance the need for a decent driver against my inner cheapskate and my penchant for what has become fashionably known as "patina."  I went to look at a 1961 out in Schertz a few weeks ago.  It looked real good in the pictures in the advertisement.  It was primered, but appeared to be solid, from what I could see in the pictures.  It also had a straight six, which I thought was cool.

When I showed up, I could immediately see that the truck was not what it looked like in the pictures.  I'm not sure if someone did a crap job of finishing their bondo repairs, or if it was just unrepaired rust bubbling up, or a little of both, but the body looked really bad under the new primer.  Judging from the overspray that I could see, it looked like the engine had been painted in the truck, which implied to me that nothing else had been done to the engine in a while.

I had lost interest before the owner even came out of the house, but I talked to him for a little while anyway.  He said at one point that the truck had been sitting in a field for a while before he acquired it.  He had described his asking price as "firm" in the ad, but as he realized that I wasn't interested, he started dropping it without me even bringing up the subject.  He knocked more than 10% off the asking price in two minutes of casual conversation.  "I want you to have this truck, man."  Not as bad as I want you to have it, sir.

I once looked at another vehicle that the seller said had been sitting in a field.  That was Matilda.  I bought her anyway.  You can see how that turned out in other posts here.  Learning as I go, I guess.  In addition to all the rust damage that had to be repaired on the body and floor pans, some of the bumper mounting brackets were pretty rusted up, and there were some parts of the frame that showed some rust damage, too.

Probably the worst part of the frame is the passenger side front corner, where there appears to be some rust damage, and where the vehicle appears to have also sustained damage from a wreck.  For example, there is a brace that runs diagonally from the frame rail to the front crossmember on that right front corner of the car.  There is a mounting hole that passes through both the frame and the brace, and I noticed a while ago that the two pieces of metal didn't sit flush against each other like they should at that hole.

You can sort of see the gap between the two pieces in this picture:

This recently became an issue when I tried to bolt up some of the aftermarket suspension stuff that I bought.  The stock strut rod is supposed to mount to the frame through that mounting hole, with a big rubber bushing that makes it a little more forgiving of the damage from the wreck.  The aftermarket strut rod that I got has a hard-mounted bracket with a swivel joint and no bushing to flex or wear out.  When I went to bolt that up, I noticed that the lock washer hadn't compressed even though the torque wrench had already clicked.  Then I remembered the damage I'd noticed before and realized that it was causing problems.

When I first noticed the damage, I was hoping that the process of bolting up the strut rod would compress the two pieces of metal together, but it didn't work out that way.  It looked like there was a lot of crud accumulated between the two pieces of metal, so they couldn't pull together even if they wanted to.  So, I stared at it for a while, and then my buddy John said why don't you just cut that brace out, clean out all that crud, and weld it back together.

Well, I wasn't real wild about the idea of cutting up my frame, but the more I thought about the problem, I eventually decided it was the right thing to do.  There were three welds at the crossmember and two long welds at the frame.  I studied it for quite a while and decided I could get at all of them well enough to do the job with a cutoff wheel on an angle grinder.

Here's a view of the brace running from the frame to the crossmember:

And here's a photo from after I cut it out:

And here's a close-up view of all the crud packed in there:

I'm still not sure what it was.  Some of it crumbled away like it was just dirt that had packed in there over time.  Other stuff was a lot harder to grind away, and even looked kind of shiny where I cut into it.  I know that the factory used lead filler in some of their body work, and I started to worry that maybe they used it in their frame, also.  I don't know.  I was almost done by the time that occurred to me, so I just finished up.  Then I went inside and looked up the symptoms for lead poisoning.  Hmmm ... irritability, decline in mental functioning, memory loss.  Well shoot, how am I supposed to know if I have that?  Sounds like just another day....

Anyway, here's a close-up photo from after I cleaned all the junk out of there:

Then I went back and ground away the powder coating to get it ready for welding back together.  The brace would sit nicely in place without anything holding it there, so here you can see how it was prepped for welding:

I figured the best thing to make sure that the strut rod would mount up properly would be to just use the strut rod to hold the pieces together during welding.  So I torqued up the strut rod, and then John came over with his welder and stuck it all together:

A photo from after the welding was finished:

Next thing was to paint it all.  I was planning to use POR-15 again, because it is supposed to give excellent protection from rust.  The heat from the welder looked like it had kind of burned the powder coat in some places, so I went through and ground off any powder coat that looked questionable.  There were some scratches in the powder coat around the middle of the crossmember, so I was planning to paint that, too.  I went over everything that I planned to paint with something like a 120 grit sandpaper, to scuff up the powder coat and give the paint a better surface to adhere to.

This picture is after paint prep:

This picture is from a similar angle to the first picture and shows that the two pieces of metal are now drawn up closer to each other:

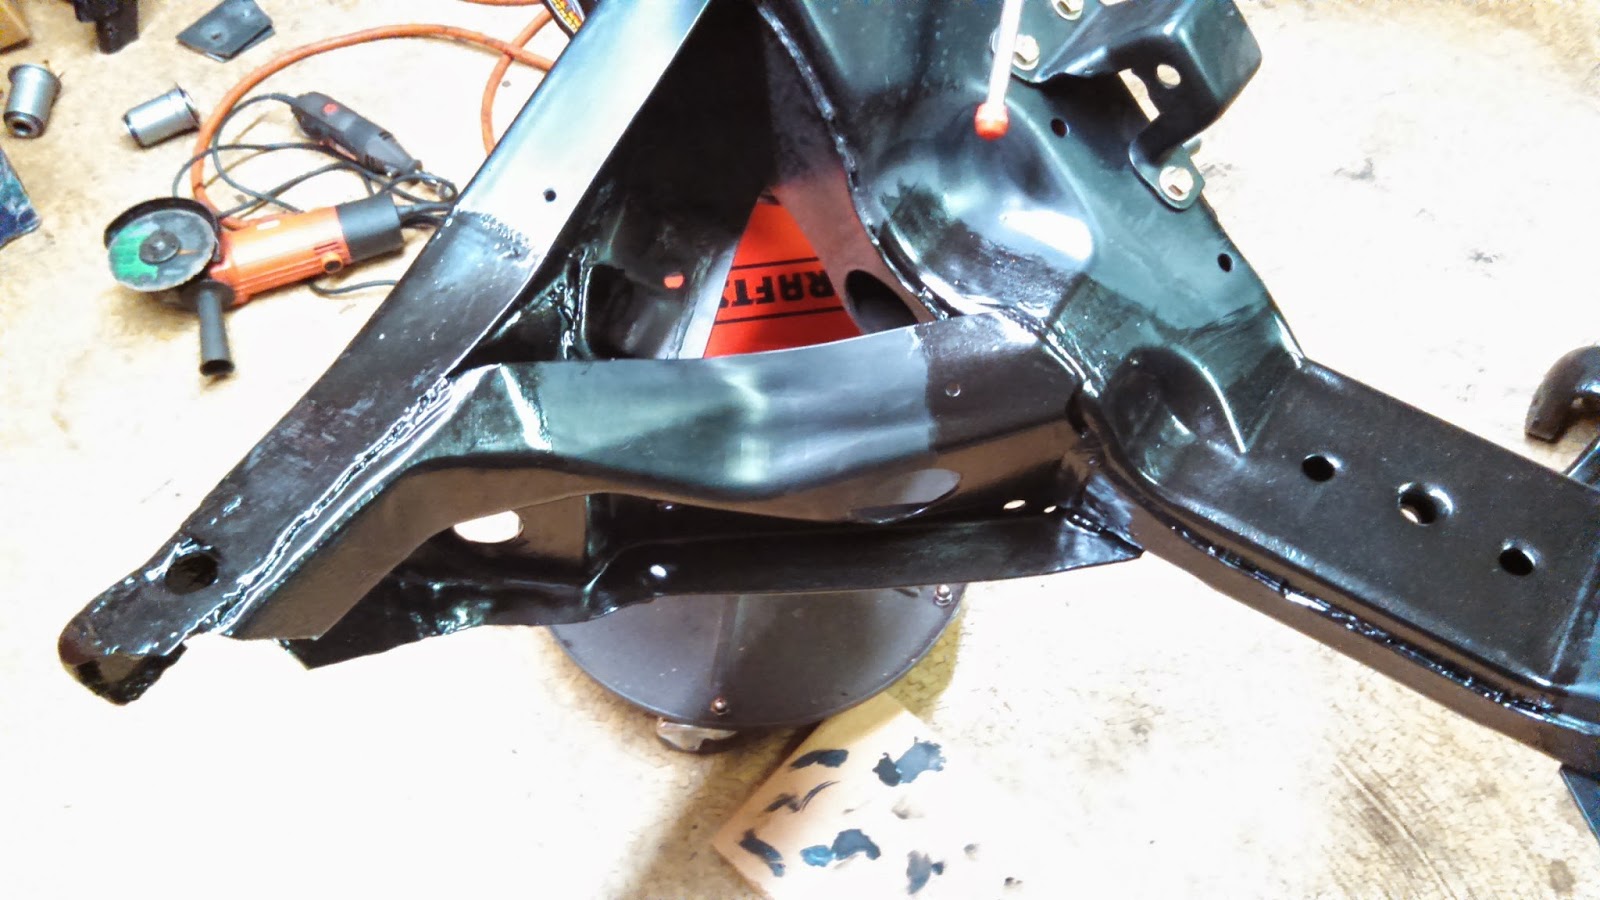
And this photo is after paint:

I did four coats of POR-15 semi-gloss black.  On the inside where the two pieces of metal come together, I slopped a bunch of paint in there to try to coat and seal everything as best as I could.

Here's another photo showing how much better the two pieces of metal fit together now:

Not sure why the paint looks green-ish there, trick of the light or something, I guess.  Anyway, this whole deal was an unexpected setback, but I think it looks like a decent and effective repair.

It should be ready to bolt up the strut rod and the rest of the front suspension now.  I think I'm going to need the weight of the engine on the frame to be able to compress the front suspension springs, though, so now I'm working on getting the engine put together.  Pictures of that to come.

Thursday, September 04, 2014

Mmmm ... sandwiches.

"OK ... let me tell you why you're a moron."

The guy at the machine shop didn't exactly say these words to me, but ... you could read it in his eyes.  I had just explained to him everything from the last two paragraphs of the previous post here, and I could tell that he was already mentally rejecting it faster than I could talk.  That was a little discouraging, but then he walked me back into the shop and explained to me how a smart person would do it.

I had tried to look around online about how to install a cam button and set cam endplay, and I didn't find anything that was much help, but the guy at the machine shop explained that what he does is to take an old cam button base, put some clay on it, the cam button base in place on the front of the cam, then assemble the timing cover over it, then disassemble and measure the clay to see what length cam button you need.  It's so simple, I felt like a moron for not thinking of it myself.  But he gave me some clay to use.  So that was nice.

Then he told me that I had the wrong timing set (although in this case "wrong" means "not what he prefers").  I had the gears that Comp sent me with the cam, but he said he doesn't like those, he likes to use a timing set with a Torrington roller bearing integrated into the cam timing gear.  So he ordered up one of those for me.

I ordered a disc brake conversion kit a while ago, and the kit requires the steering arms to be machined a bit for clearance, so while I was there I gave the guy the steering arms so he could machine them.

Fast forward to last Friday, I took the day off from work and went back to the machine shop to pick up my steering arms and my new timing set.  I also went and picked up my rebuilt rearend on the same day, and then, because of Labor Day, I had three days to put everything together.  Visions of a fully assembled suspension danced in my head.

Instead, I ended up spending three days painting stuff.  I wanted to paint the steering arms, and I wanted to paint my spindles, and I had to cut my aftermarket lower control arms a bit to clear my steering arms on my aftermarket spindles, so I painted the exposed metal where I cut the lower control arms.  It's a special paint called POR-15.  "POR" stands for "Paint Over Rust."  It is supposed to neutralize surface rust, and form a durable coat of paint to prevent future rust.  But they say to apply at least two coats and wait two hours between coats.  So if I do three coats, it takes four hours, which makes it a time consuming process.

I also worked on the frame a little bit.  The car seems to have been in a wreck on its right front corner some time in its past, and the bumper bracket mounting holes on that right front side of the frame were all bent out of shape.

The left side looks like this:

The right side looked like this:
You can see that the bolt holes are torqued out.

My best idea for how to fix it was just to make a steel plate sandwich that I could assemble around the frame, and flatten the frame wall by torqueing the sandwich together.

So first I went to the home improvement store and I bought a piece of steel, 3/16" thick, and four inches wide.

Then I cut out a cardboard template of a shape that would fit on the inside of the frame rail:

Then I traced the template on to my piece of steel, and I cut off that shape using an angle grinder and a cutoff wheel:
I actually made both sides of the sandwich this shape, even though I realized later that it would have been easier and better to just make the outboard side an oversized rectangle.

Then I held the inboard piece in place and marked the centers of the deformity on the bolt holes.  I center-punched the marks to get ready for drilling:

I drilled one piece, used those holes to mark centers for the holes on the other piece, then drilled that piece:

I took some Grade 8 hardware and assembled the two pieces of steel on either side of the deformed bolt holes.  I forgot to get pictures of that, but I think you can probably imagine.  I torqued the bolts down as tight as I could, and then I hit them with a cordless impact wrench, too.  By the time I was done with that, the plates had drawn the frame pretty flat, but the bolts seemed to have galled, so I cut the heads off the bolts to get the sandwich apart.  At that point, I had this:

That was pretty good, but I thought it could be a little better, so I just took a hammer and started pounding down any high spots that were left.  By the time I was done with that, I had knocked off some of the powder coat, but the frame was pretty flat, at least:

The next step was to paint over the area, to cover where I'd knocked off the powder coat.  I used more POR-15, which I had in a semi-gloss black, so it doesn't quite match the flat black powder coat.  Good thing my priority is functionality over appearance:

From a little bit different angle:

I also did get around to measuring for my cam button.  I didn't have an old button to use as a base, so I bolted the cam gear on to the cam, and then I packed some aluminum foil into the cam button hole, to form a base.  Then I stuck the clay on top of the aluminum foil base.  Then I bolted on the timing cover over the clay, but when I went to remove the timing cover, the clay wanted to stick to it.  So, I got another piece of aluminum foil, flattened it, and stuck it to the timing cover side of the clay.  Then I had a clay sandwich on aluminum foil:

That arrangement seems to work pretty well.  I've gone through the assembly-and-disassembly process several times over the course of a few days, and I feel pretty good now about the measurements I got.

While bolting up some of the front suspension stuff, I found some other crash damage on the frame, which I'm going to attempt to repair, as well.  I am supposed to get a delivery of some parts today or tomorrow, at which time I'll be able to put the rear end up under the back of the car and get the rear suspension put together.  That will be exciting, as I think it will be the first time that I start to feel like things are actually going back together.  On the other hand, that's not the first time I've thought that, so I might just discover more problems, instead, but ... we'll see....

Wednesday, August 13, 2014

how to build an engine at the speed of plate tectonics

It's been about three or four weeks, now, that I've planned to make big progress on the engine build over the weekend, and then gotten about half a step into the job and not been able to go any further.

After getting the lower end together, the next thing was to install the cam and timing gears.  So, I sat down one Saturday morning and pulled out the instructions for installing the timing gears.  The instructions said to install the cam thrust plate.  Cam thrust plate ... cam thrust plate ... I don't have a cam thrust plate.

Turns out that big block Chevys before the 1980s didn't have cam thrust plates.  During that era, they all had flat tappet cams, and since the cam lobes are ground on an angle in order to spin the tappets, they decided to use that angle to also make the tappets constantly push the cam back in the block.  That way, you only need one thrust surface, which is where the back of the cam timing gear rides on the front of the engine block.

But, if you use a roller cam, then your lifters aren't supposed to spin, so there's no angle on the cam lobe, which means that it is free to move forwards in the block, which means you need to stop it from doing that.  This is done by way of a "cam button," which is installed on the front of the cam, and which butts up against the inside of the timing cover to keep the cam from moving forwards.

The two main types of cam button are nylon, or roller.  The nylon button is a hunk of nylon that rubs on the timing cover.  The roller button is steel and has roller bearings so that it doesn't rub on the inside of the timing cover.  It costs about twice as much as the nylon button, but that's about $8 compared to about $4, so I decided to get the roller button.

It seemed to me at the time that the stock stamped steel timing cover would be a little flimsy for locating the cam, but they say this is how it's done, so I just went ahead and ordered a cam button.

In the mean time, I decided to at least install the crank timing gear.  Comp Cams recommends that you buy a tool and an adapter for this job, but it's kind of expensive, and I thought, hey, I can make that stuff, and save some money.  So, I made an adapter out of a piece of pipe, and I figured I'd just use a harmonic balancer bolt to pull the balancer on (that's what I did on the Corvair).

To make the adapter, I used a pipe nipple and a pipe cap.  The pipe was large enough to fit over the crank snout, but it was also big enough for the harmonic balancer bolt to fit through.  By cutting the end off of the cap and flipping it around, I could make a piece that would prevent the bolt from passing through the pipe.

Here are pictures of the pipe pieces, to show the concept:

 
As purchased:

As modified:

As assembled:
So, I had an adapter, but it was a little too long for the bolt to reach through it, so I cut it down a bit.  Trouble was, I didn't realize that by the time I had cut it down to what I thought was the right length, it was going to bottom out on the front of the crankshaft.

So, I went to install the gear, and the adapter bottomed out.  But I didn't realize it had bottomed out, I just thought it was taking a lot of force to push the timing gear on.  So, I'm cranking away on what I didn't realize was two unmovable objects, and then I notice that, hey, I've been cranking pretty good here, but nothing's moving much.  So I try to back the bolt out, and ... it won't back out, either.  Now I'm panicking.  In addition to the fact that crankshafts are not cheap, there is also all the time that I've put into building the bottom end up, and that will have to all be un-done and re-done if I have to replace the crankshaft, or even remove it for repair work.  Crap, crap, crap, crap, crap, crap, crap!!!

Eventually I was somehow able to extricate the bolt, but when it came out, it was missing about a quarter inch of threads on the end.  I should mention, I guess, that I was using the old harmonic balancer bolt for this, not the new one.  Anyway, it looked like this:

 
So, I'm thinking, crap, I stripped this thing out, but it really looks like the threads just came off the bolt, maybe the threads in the crank are OK, or maybe they can be salvaged.  So I took the new harmonic balancer bolt and tried to thread it into the crank, but it wouldn't start.  So, I went to Harbor Freight and got a tap and die set with fine-thread taps, and I tried to clean up the damaged threads in the crank.  I got it to where I could run the new bolt in and out by hand, although it feels a little tight.  I never ran the tap all the way down the hole, I just cleaned up the damaged threads at the front of the hole.  It's not a very good picture, but I tried to show the threads here:
 
 
The shiny silver threads at the front are the damaged ones, the gold-ish color towards the back haven't been touched.
 
So next, I did one of the things that I should have done in the first place and went down to Auto Zone to rent their harmonic balancer installer.  It has short adapters to fit different crankshafts, and a long bolt that threads into the adapter, and then a larger tube which is threaded on its outside, and which the long bolt runs down the middle of.  So you mount all that to the front of the crank, and then there's a nut threaded on to the larger threaded tube, and you run that nut down to pull the harmonic balancer (or crank timing gear in my case) on to the crank.  There's a bearing that goes between the nut and the balancer, too, but you get the idea.  Also, I still needed to make an adapter out of a new piece of pipe, but the extra length of the installer tool allowed me to make the adapter long enough so that it wouldn't bottom out.

OK, so anyway, the adapter for the installer tool has less thread length than the harmonic balancer bolt, as you can see here:
 
 
The adapter was going to be mostly grabbing the damaged threads, so I thought, well, this will be a good test to see if those threads are good for anything at all.  So I set it all up, started turning the nut to install the timing gear, and the whole installer tool was turning.  I thought it was turning in the damaged threads, and I thought, "crap, those threads aren't doing anything at all, they're junk, I'm screwed."  But, there are flats on the tool, so I tried putting a wrench on there to try to stop it from turning, and then I was able to use it to run the timing gear down.

HOWEVER ... I realized later that I was wrong ... it wasn't that the installer tool was turning in the crank threads, it's that the large threaded tube on the installer tool is just clamped between the long inner bolt and the adapter, but it isn't really secured to either one very well.  That's why they put flats on it, because if you don't put a wrench on the tube, it will just spin around the inner bolt.  I would guess that is by design, so that you are not transmitting any torque to the adapter, which might strip out otherwise.  Smart design.  Stupid operator, but smart design.

I'm getting ahead of myself a little bit, though.  My original thought was that it looked like there were a lot of good threads behind the damaged threads, and that maybe a longer bolt could reach back and engage more of those good threads.  So eventually, after messing around with some other of this other stuff, I started trying to figure out what was the longest bolt that could fit into the hole, so that I could use as much thread as possible if I could find a longer bolt.

After taking a lot of measurements, I decided that there isn't even room for another quarter inch of bolt length.  You might be able to fit 3/16in., but not any significant amount.  So then I thought, well, what's my thread engagement right now, and I measured that out and decided that right now the bolt should be engaging about .515in. of good threads, plus another 0.2in. of the damaged/repaired threads.  I looked up an online calculator for minimum recommended thread engagement, and it was saying that for this size bolt, minimum thread engagement should be somewhere around 0.45in., which would mean that at .515in., I'd have more than the recommended minimum just with good threads, not even counting the repaired threads, which I think are also doing some good.

So basically, after all that and everything else, I've decided that I am OK just using the bolt I have in the crank as it is.  So, most of the money I saved by not buying the recommended tools went into buying the tap and die set.  But, when you consider all the money that I saved by shortening my life by a couple years through anxiety and worrying over the damaged crank, I still came out ahead.
 
Anyway, during that same week, my roller cam button showed up.  Now we're back on track.  Eager to make some progress, the next weekend I sat down with my instructions again, and I read a section that I somehow missed the three times that I previously looked through the instructions.  It explains about how the stock stamped steel timing cover is too flimsy to locate the cam accurately, and you really should get a cast aluminum or otherwise stiffened timing cover.  Son of a gun, seems like I've heard something like that before ... somewhere several paragraphs ago....

So, I look through a bunch of aluminum timing covers, and eventually order one that seems to be the best mix of not-too-pricey and not-too-flashy.  I didn't really want a lot of aluminum parts on the engine, but at least there's a good reason for this one, I guess.

I guess I should also mention that somewhere along the line with all this other stuff, I tried to put the cam timing gear on, and I found that it wouldn't go on.  It felt like the locating dowel was a press fit, but I was pretty sure it wasn't supposed to be a press fit.  I think that, far and away, the best thing about Comp Cams is their tech support.  I mentioned in an earlier post about how I filled in their forms to get a cam recommendation, and I was contacted by an actual person with whom I was able to carry on a dialogue.  Customer service.  What a crazy concept.

Well, ever since then, even months after the sale, if I have a question, I can e-mail that same guy, and he will get back to me quickly (often less than an hour, but always within a business day) with an intelligent and helpful response.  So, I asked him, hey, is this cam gear supposed to be a press fit?  He said no, they must have put the wrong dowel in it.  So, we went around and around on options, but eventually I decided to just open up the hole in the cam gear a little bit with a rat tail file.  He said that would be fine.  He even said that he has run cams without a dowel, the main purpose of the dowel is just to make it so that you can't put the gear on in the wrong orientation.

Anyway, eventually my aluminum timing cover showed up.  I went out to the garage on Saturday to test-fit the cam button with the timing cover, and ... the timing cover wouldn't even bolt up to the block with the button in place.  It wasn't even close, either, it was almost a quarter of an inch away from the block.  So, I decided the thing to do is to find a machine shop that can remove some material from the cam button and the inside of the timing cover, to bring cam endplay into spec.

While taking measurements to try to determine how much material to remove from each part, I noticed that the cam timing gear is about 0.010" back towards the block from where the crank timing gear is.  So, there is a company that offers a thrust washer to put behind the cam gear, where it bears against the front of the block.  The cam gear needs to be machined to accommodate that thrust washer, but that works out well, because right now my plan is to put that thrust washer behind the cam gear, then get the gear machined by 0.010" less than the thrust washer's thickness, to bring the cam gear back in line with the crank gear.

At the same time, I'll get the same shop to machine about 1/8" off the cam button's length, and about 1/8" off the inside of the timing cover.  That should put me close on camshaft endplay, close enough that I can assemble the parts and measure it.  Then if I am over the endplay spec, I can measure how much I'm over by and get that thickness machined off the mounting flange of the timing cover, to bring it back towards the block and tighten up the endplay to bring it in spec.  That would also help if I end up having to run a 1965-style short water pump, instead of the 1972-style long one that I am used to, which will be a whole other thing ... but, one thing at a time....