Anyway, the point is, there's some catching-up to do on this record of events, and I feel like I can't move on to other things until I get caught up on what's happened so far. I made a list of stuff that's been done which I haven't written about yet ... my goal for this entry is to get through that list.
When I went to pick up the car from the body shop and bring it home, I had a taxi drop me off there on a Friday. I paid my last bill and talked to the owner a little while, and then got in the car to drive it home. When I started it up, there was a squeal that sounded kind of like a loose belt, but not really like a loose belt. It hadn't sounded like that when I dropped it off, so it was a surprise. I looked at the owner of the shop, and he didn't look surprised or concerned, so ... hmm. I knew he'd driven the car to and from the shop that mounted the exhaust, so maybe it had been doing this the whole time he'd been driving it? It had made the noise when I first started it up, but almost immediately got quieter once the car was idling. I felt like I just wanted to get it home, and the taxi had already left, so ... I decided to just get going. On the drive home, the squeal would get worse whenever I was accelerating at all, and it was less noticeable at steady speed. Anyway, the car made it home without any significant issues. Hooray.
So now ... what was this noise? It didn't, upon further investigation, seem to be coming from any of the belts. I tried running the engine and using a mechanic's stethoscope to find where the noise was coming from, but it was hard to pinpoint. Eventually, I put the car up on ramps and rolled under it on the creeper while it was idling. Using the stethoscope, I felt pretty sure the noise was coming from ... the starter motor? How could that be?
It wasn't really a squeal, as I said earlier. Sometimes it sounded like a squeal, sometimes it sounded like an intermittent mechanical interference, sort of like a "tink ... tink tink ... tink ... tink tink tink ... tink tink ... tink ...." It was difficult to figure out. Thinking that it sounded like it was coming from the starter motor, I ended up pulling the starter motor off for inspection. Where the pinion slides out to engage the ring gear, there is a small bushing on the pinion shaft that stops the pinion at the end of its travel when it is engaged during cranking. That pinion stop seemed pretty loose and had some questionable endplay, and I started to think that maybe it was interfering with the flywheel just enough that the flywheel was rattling the pinion stop on the pinion shaft, leading to the noise I was hearing.
To test that theory, I got some yellow marking compound from a local differential shop, the same stuff they use to check the pinion depth in a rear end. I put some on the starter motor pinion, and also on the pinion stop. I put the starter motor back on the engine, and ran it again. Still had the noise, of course ... pulled the starter motor back off and checked it...

Aha! Where I had applied the yellow marking compound around the whole circumference of the pinion stop, a stripe had been wiped off of about half its width. This would seem to indicate an interference, and confirm my theory. You can see the stripe of bare metal next to the yellow marking compound on the pinion stop in the photo above. Also, the pinion stop should be constrained pretty close to the surface to its right, but you can see that there is a gap there. This endplay seemed questionable. So now my theory was that the pinion stop was sliding on the shaft and interfering with the flywheel. If it were constrained to the right, it wouldn't interfere.
I got in touch with the manufacturer of the starter motor, and after some back-and-forth, I sent the starter motor back to them for inspection. They did some rework to reduce the pinion stop endplay, and sent the starter back to me. I put it back on the car, confident that the problem was fixed, and started it up. Still making the same noise ... nuts.
So then what caused the marking compound to be worn off the pinion stop? I don't know. Maybe the pinion itself rides against that part of the pinion stop during normal operation? In any case, it didn't seem to be the cause of the noise.
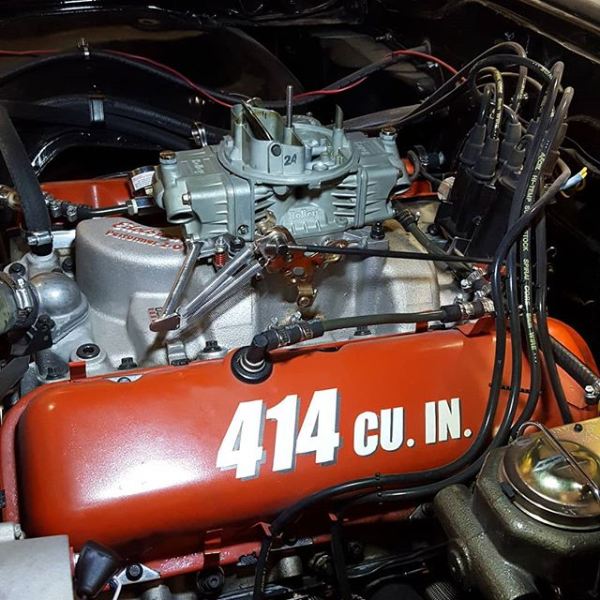
Back to the stethoscope. Eventually, after a lot more hunting around, I finally had a breakthrough. While revving the engine by hand and listening with the stethoscope, I finally realized that the noise wasn't coming from the starter motor, it was coming from an exhaust leak at the bottom of the header flange, directly above the starter motor. A coworker had recommended some specific header gaskets to me, he said they worked real well in his experience, and he said they were reusable. I like things that are reusable, and I like things that work really well, so it sounded good to me.
Well, as it turns out, even though they were supposed to be correct for my engine, the exhaust port holes in these gaskets were just ever so slightly larger than the sealing surfaces around the exhaust ports in my header flange. In the photo below, the reusable gasket is laid on top of a more traditional disposable gasket. If you look closely, you can see a sliver of the disposable gasket visible at the top and bottom of the hole in the reusable gasket, showing that the vertical dimension of the hole is just slightly larger on the reusable gasket. You can also see a black mark at about the five o'clock position on the hole in the reusable gasket. That is where the exhaust was leaking out past the gasket.

The reusable gasket is made up of layers of soft aluminum, and it is supposed to conform to the mating surfaces and create a seal. With the leak moving past the surface of the gasket, the layers had started to delaminate, and they were vibrating against each other like reeds, creating the noise I had been hearing.
I pulled out the aluminum gaskets and replaced them with some more typical disposable header gaskets. These still had some leaks, but at least the squealing "tink tink" noise was gone. I drove the car like that for a while, just putting up with the audible leaks, and then eventually I made another attempt at a fix. While looking for parts for another project, I saw some headers that said they didn't require gaskets, they said they had an extra thick flange that was machined very flat, and they said that if you just applied a high-temperature RTV silicone, that was all you needed for a gasket. That surprised me, because I would have thought that even a high-temp RTV would just burn up and blow out when exposed to exhaust gases. But they said it was supposed to work. With that in mind, I ended up replacing the header gaskets on the Impala one more time, and this time I also applied a thin coat of high-temp RTV to the gaskets. This seemed to work pretty well, and has held up OK so far.
Another thing that was clearly in need of attention, even before I got the car up to the body shop, was the throttle linkage. It wasn't as noticeable, maybe, driving the car around my neighborhood, but on the way up to the body shop it became apparent that the linkage needed some improvement. The stock linkage had mated up to the Holley throttle lever relatively easily, which makes sense, I suppose, as the top-of-the-line 396s in 1965 had Holley carburetors on them. But I'm not sure if those Holleys in 1965 had the same throttle lever as what you get with the modern one-size-fits-all aftermarket arrangement.


If you squint real hard and already know what you're looking at, you can kind of make out how the throttle linkage now connects to the throttle lever a little further away from the axis of the throttle shaft.


It's not perfect, and if I were to do it over there are a few things I'd change, but it does the job well enough that I don't feel compelled to re-do it right now. A large part of the floor that should have been covered by the back seat was still exposed at this point, but that will be a project for another time.

In many ways the state tech inspection process is kind of a farce, anyway. To make the most of the situation, I tried pretending that this was a pre-race tech inspection. If you're going to take five years of your life to build a pretend racecar, it is considerate, I guess, for the state to arrange a pretend tech inspection.


Another thing that was clearly in need of attention, even before I got the car up to the body shop, was the throttle linkage. It wasn't as noticeable, maybe, driving the car around my neighborhood, but on the way up to the body shop it became apparent that the linkage needed some improvement. The stock linkage had mated up to the Holley throttle lever relatively easily, which makes sense, I suppose, as the top-of-the-line 396s in 1965 had Holley carburetors on them. But I'm not sure if those Holleys in 1965 had the same throttle lever as what you get with the modern one-size-fits-all aftermarket arrangement.
Anyway, when I first connected the throttle linkage, I had carefully selected the hole on the throttle lever that I used by using the following criteria: it was the only one that would move the throttle in the right direction (pull to open, rather than push) and had the right diameter to fit the post on the swivel rod end at the end of the throttle linkage. There was another hole that would give a longer effective lever arm, but its diameter was significantly bigger than the post on the throttle linkage swivel rod end, so that wouldn't work. But, as it turned out, using the hole that fit the swivel rod end post meant that the effective lever arm was on the short side. That meant that the throttle linkage had less leverage against the throttle return spring, so it took a little more force than usual to press down the gas pedal. That might have been OK, but the short lever arm also meant that a relatively small movement of the gas pedal resulted in a relatively large change in throttle position. When you add that to the increased force required to press the gas pedal, it made the whole arrangement touchy and awkward.
So, after I had the car back in my garage, I disassembled the throttle linkage to rework it. This essentially boiled down to creating a bushing to take up the difference in diameter between the hole in the carburetor throttle arm and the post on the swivel rod end. I had some cylindrical spacers of different diameters and wall thicknesses on hand already, and I was able to cut off some short lengths and nest them together to make up the difference in diameters, then put some washers on the sides to help hold it all together once it was assembled. Nothing real fancy, but an effective fix. I'm not sure if I have any good pictures floating around at this point, but the two photos below show the first arrangement (top) and the new arrangement (bottom).

If you squint real hard and already know what you're looking at, you can kind of make out how the throttle linkage now connects to the throttle lever a little further away from the axis of the throttle shaft.
You can also see that there is a double spring arrangement for the throttle return springs now. The one in the stock location didn't seem to reliably return the throttle to the fully-closed position, and I saw the two-spring arrangement available from Moroso. It's made to mount to the Holley carburetor base, instead of running a spring to a point somewhere forward on the engine. The bracket for the springs interfered with the dropped base of my air cleaner, but I was able to just bend the bracket down a bit, and it seemed to work pretty well after that. I had to get one longer carburetor stud for that corner of the carb, in order to accommodate the thickness of the bracket. The stud I ended up using was only available in a box of ten, so if you need anywhere between one and eight little-bit-longer carburetor studs ... let me know. (I say eight, instead of nine, because I ended up using the same throttle return spring arrangement on the 396 that I swapped into my C10. And I say eight, instead of eighteen, because I was actually able to find the box of nine spares when I needed one for the C10, so I didn't have to order a second box of ten.)
So, that sorted out the annoying exhaust leak noise and the annoying throttle feel. The last thing I needed in order to pass inspection was functional windshield wipers. It is possible to buy rebuilt/reproduction windshield wiper motors for the 1965 Impala, but they are astonishingly expensive. I had a wiper motor that fit the car, which was in the trunk when I got it, but it was pretty beat up and didn't work when I tried putting voltage to it. There were a lot of different Chevrolet wiper motors that all used the same electric motor, but mounted that motor on different mounting plates with different bolt hole patterns and different drive arm lengths. I got an idea....
I bought a much cheaper windshield wiper motor that used the same electric motor, thinking I could transfer that electric motor to the wiper motor assembly I had for the '65 Impala. Disassembly required drilling out a bunch of rivets, but once I had it apart I was able to clean everything up and apply a fresh coat of paint. The rivets that held the original assembly together were not pop rivets, but I figured pop rivets would be OK for putting it back together. The bare aluminum rivets even looked a little flashy against the fresh coat of black paint. It was all coming together nicely. I took lots of pictures, and I would quietly chuckle to myself as I worked on it, thinking about what a clever solution this was, and what a great blog entry it would make (at some indeterminate point in the very distant future).
Then I got it all back together, and it didn't work. I don't even remember what the problem was, specifically, I just remember it didn't work, and I was disgusted and discouraged, and decided to cut bait. I chucked all of that and bought an aftermarket wiper motor that was made to fit 1965 Impalas. I think it is a late-model wiper motor for a Mitsubishi or a Jeep or something like that, and some company basically fits it with a mounting plate that will bolt up to a 1965 Impala firewall, and adds a drive arm that will work with the 1965 Impala wiper linkage geometry. I think they use the same wiper motor with different mounting plates and drive arms to fit it to a wide variety of classic cars and trucks. The downside is, it looks kind of like a late-model part, and doesn't really blend in with all the other underhood stuff. The upside is, it has two speeds (the wiper motor I had for a '65 Impala only had one speed), and it's waaaaay cheaper than the rebuilt/reproduction 1965 Impala wiper motor.
One last complication was that the 1965 wiper motor has a constant positive voltage wired to it with a switched ground to turn it on and off, whereas the aftermarket motor is grounded and uses a switched positive to turn it on and off, so I had to rewire my wiper motor control to accommodate that change, but that was pretty straightforward. At the time I just wired it for one speed, just to have something working so I could pass inspection. I had that one speed wired to one of the toggle switches on my dashboard. That was a minimal level of functionality, as the "park" function wasn't even wired up, so you would have to try to turn off the wipers when they were relatively close to their parked position at the base of the windshield. That was a bit of a hassle, so later I swapped in a double-throw toggle switch and wired it so that flipping the switch up would put the wipers on low speed, and flipping it down would put them on high speed, and I used the normally-closed side of a relay to make it so that the "park" input is energized when the switch is in the off position. (I should mention, the wiper motor came with a switch that would have made wiring much simpler, but I wanted to run everything through a toggle switch that would blend in with the other toggle switches.)
So, at that point I had everything I needed in order to pass inspection ... but the interior of the car still looked very bare, and I thought maybe it would help to ease the inspection process if it looked more like a finished car. I already had carpet and door panels on hand, so I figured I might as well install all that stuff.
The photo below shows the car at the body shop, with no carpet and no door panels.

And the next photo shows carpet and door panels installed. Also arm rests, window cranks, etc.

There's not really much to talk about there. The carpet is molded to fit the floor, the door panels and other stuff are all reproductions of factory originals, so it all just kind of goes in place. But you can see that it makes a big difference in making the car look more roadworthy. There was a little bit of a hassle with installing the reproduction window cranks on the reproduction window regulators. I had original window regulators for the door glass and rear quarter glass, but I'd gotten reproductions for the vent windows, because one of those was not functional and needed to be replaced. The end of the shaft that the crank is supposed to pop onto didn't seem to have quite enough taper for the clip to pop over, so I had to do a little grinding on those, but it ended up all going together relatively easily after that.
That had the front half of the interior looking pretty sharp, but the rear half was still a little lacking. With a stock interior, a lot of the back seat area would be covered by the back seat. It would cover a lot of the floor, and also some of the lower half of the sides. But since I left the back seat out, those areas were all uncovered metal. I wanted to make some upholstered panels to cover the exposed metal on the sides of the car, at least. In the photo below, you can see the exposed metal below the upholstery panel on the side of the back seat area.

I started by trimming a piece of cardboard to fit the areas that I wanted to cover.

The "hashmarks" represent the upper edge of the exposed area, but I left some extra margin beyond that point so that the panel would extend up behind the stock upholstery panel a little bit.
Next I got a couple pieces of corrugated plastic sheet from Home Depot and cut them to the same shape as the cardboard template.

I was actually doing this project around the time of the elections in 2018, and I was tempted to nab a couple of political campaign signs from some place, since those are also often printed on corrugated cardboard. But I thought the chances were good that any candidate whose signs I used would eventually do something to disgrace him-/her-self, and then I'd know that their name was inside of my car somewhere, so I decided to just get some plain black corrugated plastic to work with.
Lastly, I covered each of those plastic panels with black vinyl from a fabric store, and attempted to affix it with glue.

I used a glue called E6000, which the internet assured me was really great. It's not terrible, but I wouldn't say it is really great. The vinyl started peeling away from the plastic relatively quickly around the edges. But, it has mostly stayed in place well enough that I haven't bothered with trying to fix it yet. You can see in the picture that there are visible lines where I put the glue on the plastic. I guess maybe I should have smeared it out into a flat film of glue so that the line of the bead wouldn't be visible, but that's hindsight. And it looks good enough for my purposes.
The last thing was to install the panels in the car. I drilled some holes and used some small screws to attach them to the metal underneath.

I can't find any pictures of the process, but I used a very similar method for making kickpanels to cover the sides of the inside of the car under the dashboard. I was able to find reproduction carpet for that area, but the reproduction of the plastic panel that the carpet is supposed to mount to was backordered. I kept waiting on the backordered panels, but it had been several months with no sign of them showing up, so I just made plastic panels out of corrugated plastic again. The plastic panels are supposed to integrate plastic grilles to go over the fresh air vents down by the floor, so I didn't have those. I found, though, that the metal grilles from the 1964 Impala would fit the same space, so I bought a couple reproductions and used those.
While I was installing my makeshift kickpanels, my phone rang ... I let it go to voicemail because I was squeezed down under the dash in an awkward position, and the odds seemed good that the call was just a telemarketer or something, anyway. When I'd finished installing the panels, I listened to the message, and, in a classic case of the universe thinking that it's so goddam funny, it was a lady calling to tell me that the backordered kickpanels were finally available, and did I still want them? I said sure, so now I have them in a box and someday I'll install them, but the makeshift panels are doing a fine enough job for now.
I'm not sure if I actually made all those interior panels first or if I did some or all of them after, but it was roughly around this time that I finally took the car to get its state inspection so I could register it for use on the street. I hate taking vehicles in for inspections because I just don't like letting strangers drive my car, and I always wonder if they're going to nitpick something, so I wasn't looking forward to the inspection. But, it needed to be done. I ended up just taking the car to Jiffy Lube, because it was the closest place to my house where I could get an inspection, and I didn't want to drive any farther than I had to without license plates. As it turned out, it was a lot of fun. It was a big day for me, of course, and there were just three or four guys working at the time, and they were all very enthusiastic about the car. They let me hang around in the garage while the guy did the inspection and they asked questions and told me about their cars and all that. I've been back to that Jiffy Lube for inspections since then and been less satisfied, but I guess I got lucky on that particular day.

Anyway, the car passed and I was able to register it and get license plates and all that. That brought up a new problem, though ... I'd gotten a new reproduction rear license plate holder, but there didn't seem to be anything available for the front license plate. I'm still not sure how it's supposed to mount ... the front valance comes to a point in the middle, and there are a couple of flats where the license plate can be mounted, but it is obvious that the flat license plate can't be mounted directly to the pointed valance. I checked all the reproduction companies, and I checked ebay for used parts, but I couldn't come up with a front license plate bracket. I am still only assuming that such a thing exists, anyway, but I don't see any way for the plate to be mounted without something along those lines. I ended up just ordering a couple of steel sleeves off of McMaster-Carr so that I could put the license plate bolts through the middle of the sleeves, and the sleeves would have enough length to hold the license plate out away from the valance. I also ordered them with a pretty substantial wall thickness, so that they would hold things rigidly in place when everything was bolted together. I put a couple little rubber washers between the steel sleeves and the valance, to protect the paint. I don't know if the photos below are very clear, but I attempted to show how the license plate is held out away from the valance by the steel sleeves.


This puts the license plate somewhat inclined from vertical, but it does the job.
After I'd driven the car a little bit, I went to jack up the front end and discovered that my jack didn't fit under the front crossmember anymore. My assumption was that the front suspension had settled a bit once the car had gone over some bumps and cycled the suspension several times. Since then, I've also heard that supposedly new springs will sag a little bit after the first time they get hot from being close to the engine exhaust. Personally, I think the explanation that things settle when the suspension is cycled makes more sense, but either way, the point is that the car now sat a little lower in the front.
There are lots of options for low-profile floor jacks, but I didn't really want to buy another jack if I didn't have to. The cost is one thing, but also I just didn't want another jack taking up space in the garage. As I showed in an earlier entry, my floor jack has a cradle that sits in the end that supports the car, and that cradle can be easily removed. By removing that cradle, I was barely able to slide the jack under the crossmember. This seemed to work fine, I could just jack the car up with the cradle removed.
Unfortunately, there's more to that story. One day I had jacked the car up by that method, and then I finished what I was doing, and I was going to lower it back to the floor. As the end of the jack goes up and down, it traces an arc. The wheels on the bottom of the jack allow the base to roll so that the car can go straight up and down as the arm traces that arc. Well, I was lowering the car to the floor, and--WHAM!! It suddenly fell. It turned out that the floor jack hadn't been rolling, instead the end of the arm had been sliding on the crossmember, and it eventually slipped off the back of the crossmember. It put a dent in the bottom of the oil pan. Fortunately, something stopped it from completely caving in the bottom of the oil pan. Unfortunately, the something was the center drag link in the steering linkage, which was bent as a result. This was a maddening development, but I ordered another center drag link (I had already heard/read previously that it is not a good idea to try to straighten one of these once it's been bent) and it was pretty straightforward to swap it in for a fix. The good news was that the oil pan was not dented badly enough to interfere with the crankshaft, so that didn't have to be replaced. The photo below shows the bent drag link (top) and the replacement drag link (bottom).

All in all, it ended up being a relatively easy fix for something that could have been much worse. But the next question was, how to make sure it didn't happen again? Well, there is a hole right in the middle of the bottom of the crossmember, and I thought that if I could make something that would engage that hole, that would keep the jack from slipping off the crossmember. As I showed in that earlier entry that is linked above, I had previously made a transmission cradle that could fit in place of the jack cradle. I had bought a steel rod that would fit in place of the jack cradle, in order to hold the transmission cradle in place. I had some of that rod left, so I just cut a short length and tapered the end so that it would fit into the hole in the crossmember.
The next few photos show the piece that I made, and how that piece fits into the jack.


Because I love racecar stuff, I decided to add one more thing. If you look at as many pictures of racecars as I do, you might notice that some cars have an arrow or a triangle pointing downward somewhere along the side of the car. This is an indicator to help the jackman find the spot where the jack is supposed to be placed during pitstops. I decided to do something similar, to help me find the hole in the bottom of the crossmember, and also just because I thought it would be a neat detail. The next two photos show how I painted a white triangle and a white stripe on the black crossmember, to help me get the jack lined up with the right spot.


Yikes. The car has some miles on it at this point, and I am kind of surprised, disappointed and embarrassed to see how beat up the front edge of the crossmember looks. I know I have scraped a few speed bumps and other rough spots in the road here and there, but I guess I hadn't noticed that it looked this bad. If you're thinking about lowering the front of your car ... this is what you may end up dealing with. I used two-inch drop spindles in front, and I sometimes think maybe I should look at going back to a stock ride height, because (lack of) clearance can definitely be a nuisance.
All right, folks ... I am like halfway through the list of stuff that I wanted to get caught up on in this entry, but I think I'm just going to post this as it is for now, and try to get through the second half of the list soon.
As Hunter S. Thompson might have said, "Mahalo."


No comments:
Post a Comment